Supplies Needed:
Template 25 by me! You can get it on my blog HERE
PTU scrap kit by Justine "Sweet as candy" you can find the link on her blog HERE
Vix Mask 359 You can get on her blog HERE
Tubes of choice, preferably one with a larger image, and a smaller one.
Or you can use different tubes, as long as they are by the same artist!
I'm using the awesome new tube by Ismael Rac which you MUST have a lisence to use.
You can purchase his work from AMI HERE
Filters Needed:
Unplugged Tools (Interlace)
Eye Candy 4000 (gradient glow)
Ok let's get started!
Open up the template and tube of choice.
Select the circle layer. Take your magic wand tool and click inside circle.
Copy and paste larger tube as new layer.
Layers, duplicate.
On bottom tube layer, go to Selections, invert, delete.
Select none.
Now select top tube layer. Take your eraser tool and carefully erase any part of the tube overlapping the bottom of the circle.
Back on the top tube layer, go to layers, and merge down so that you now have 1 tube layer. Add drop shadow settings: 1,1,40,5.00
Select circle layer again. Selections, select all, float, defloat.
Open paper 1 from kit. Copy and paste as new layer. Selections, invert, delete, select none.
Add drop shadow.
Ok, now select rectangle 3. Again take your magic wand tool and click inside.
Copy and paste one of your smaller tubes, or another tube if you are using different ones, as new layer.
Selections, invert, delete.
Ok, now select rectangle 4, repeat the same steps, either using the same tube, just mirror it, or a different tube.
Now, on both of the smaller tube layers, duplicate them. You should have 4 total then.
On both bottom tube layers, go to Adjust, blur, gaussian blur, settings 4:00.
On both top tube layers, change the blend mode to soft light.
Then merge the top layer down into the bottom layer, on both tubes. And add drop shadow.
Select rectangle 3 layer again. Selections,select all, float, defloat, Layers, new raster layer.
Now make a gradient fill out of two colors to match your tube and elements from the kit. Settings: Linear, Angle 40, Repeats 0
Flood fill your new layer. Select none, and delete original rectangle 3 layer.
Repeat the above steps for rectangle 4 layer.
Now select rectangle 1 layer. Selections, select all, float, defloat, layers, new raster layer.
And fill with color of choice. Delete original rectangle 1 layer.
And repeat steps with rectangle 2 layer
Ok, now close out all of your layers EXCEPT for the 2 gradient fill rectangle layers, and the 2 smaller tube layers. Merge visible.
Go to Effects, Unplugged tools, interlace, and apply default settings.
Now you can open up the rest of your layers again.
Select your brush layer.
Selections, select all, float, defloat.
Open paper 8 from kit, copy and past as new layer. Selections, invert, delete.
Add drop shadow, and delete original brush layer.
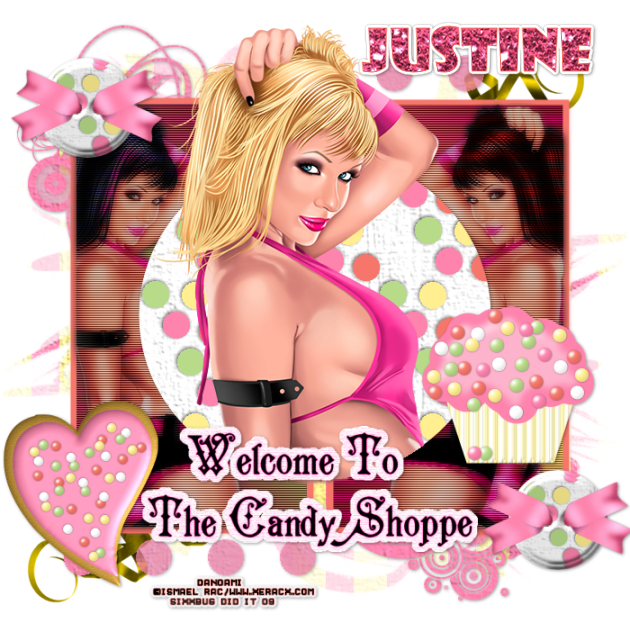
Open "Welcome to the candy shop" word art from kit. Resize by 70%
Hue and Saturation, colorize to match your tag
Copy and paste right below your circle. And add the same drop shadow.
Open one of the buttons from the kit, resize by 70%
copy and paste as new layer, put one in the upper left hand corner, and one in the bottom right hand corner. See my tag for reference.
Add drop shadow to both.
Open the gold curled ribbon from kit. Resize by 50%
Select the layer just above the bottom raster layer
Copy and paste the ribbon to the right upper part of tag, see mine, Layers, duplicate, Image, flip, Image mirror.
Ok, now I opened, both the cupcake and the heart cookie elements from the kit,
and also resized them by 50% and added them, but you can add any elements from the kit you would like!
Select your bottom rastert layer and go to Layers, new raster layer.
Open paper 6 from kit, select your foreground color, go to patterns, find the paper, and flood fill your new layer.
Open your mask. Go to Layers, new mask layer from image, and find your mask from the drop down menu, ok.
Layers, merge group
Now shut out all layers except for the mask, so you can see it
Move it up towards the left hand side of canvas. Layers duplicate, Image, mirror, Image, flip.
Delete the bottome blank layer.
Merge layers visible.
Now you can resize if you'd like. I resized the all layers, by 90%
Add your copyrights and your name.
For the name I used Showcard Gothic font. Selected a color to match the tag for the foreground color, and the pink glitter paper from the kit as the background color. Added gradient glow and a drop shadow.
Hope you enjoyed this tutorial and found it easy to follow!
This tutorial was written by me on August 3 ,2009
And any similarity to any other tutorial is purely coincidental.