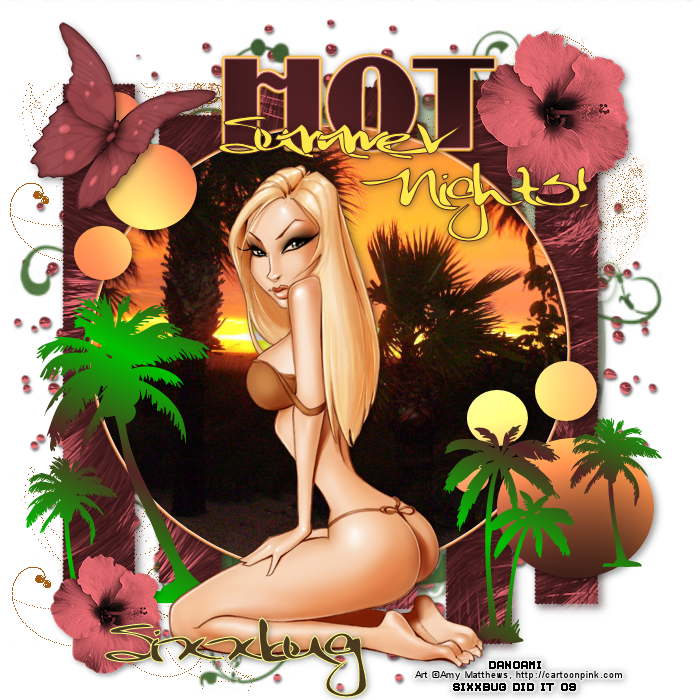
Supplies Needed:
My Hot summer template which you can download on my blog HERE
Urban Fairtales Mask 10. Not sure if you can still get this one.
But there are some other very cool one's on their blog HERE
FTU Floral Fantasy Scrap kit by Leigh which you can get from her blog HERE
Sunset picture.
This is MY PERSONAL pic I'm sharing, was took on our vacation to Florida this year.
You can download if from HERE
Tube of choice. I'm using the awesome work of Amy Matthews, which you MUST have a lisence to use.
You can get one and purchase her tubes from AMI HERE
Ok Let's get started!
Open template. Close out info layer.
Select Large circle layer.
Selections, select all, float, defloat.
Open sunset picture. Copy and paste as new layer. Arange it to where it looks right, Selections, invert. Hit delete. Select none.
Delete original large circle layer.
Ok, still on you sunset layer, go to Effects, Eye candy 4000, gradient glow. Following settings: Color Fat, click on second color box in slider, and using your dropper tool, click on the sunset to get that shade, ok.
Basic settings: 3.00, 25, 100.
Now add drop shadow: 3, 3, 40, 10.26
Select background bars layer. Selections, select all, float, defloat.
Open paper 40 from kit. Copy and paste as new layer. Selections, invert, delete.
Delete original background bars layer.
Ok, now select circles layer. Selections, select all, float, defloat, Layers, new raster layer.
Now make a gradient fill out of two color to match your tag. Settings : Linear, Angle 27, Repeats 1.
And flood fill your circles. Selections, none.
Delete original circle layer.
Still on that layer, go to Effects, Tramages, pool shadow, default settings, ok.
Add drop shadow.
Select your palm tree brush layer. Selections, select all, float, defloat, Layers, new raster layer.
And again, make a gradient with two colors of choice to go with your tag. I used a dark green and a dark brown, same settings as before, but I changed repeats, to 2.
Flood fill your palm trees.
Selections, none.
Delete original palm tree layer.
On your swirl brush layer, you can keep as is, or colorize to match your tag if needed.
Ok, now open your tube of choice and past as new layer.
Add drop shadow.
Ok now go to Layers, new raster layer, and send it to the bottom.
Open paper 60 and copy and paste as new layer.
Open up mask. Go to Layers, New mask from image. choose your mask from the drop down menu.
Make sure invert is checked, ok.
Merge group.
Delete that bottom raster layer.
Open flower 15 from kit, resize by 30% and copy and paste on the upper right hand side of tag. Add drop shadow. I also resized it a bit more and added a second flower to the bottom of tag.
Open butterfly 71 from kit and resize by 40%. Copy and paste as new layer on upper left hand side of tag. Add drop shadow.
Open element 99 from kit. Copy and paste as new layer, send to bottom.
Ok now move it up a bit so a little more of it is showing at the top of tag. Layers, duplicate, and on the second one, move down a bit so it's showing at the bottom of tag.
Layers, merge visible.
Now you can add your copyrights and any text you want to add.
I wrote out Hot summer nights. I used Binner SCD for the Hot text. And Binky for the Summer Nights.
Save as a PNG image and your all done!
I hope you enjoyed this tutorial and found it easy to follow.
This tutorial was written by me on July 22 ,2009
And any similarity to any other tutorial is purely coincidental.