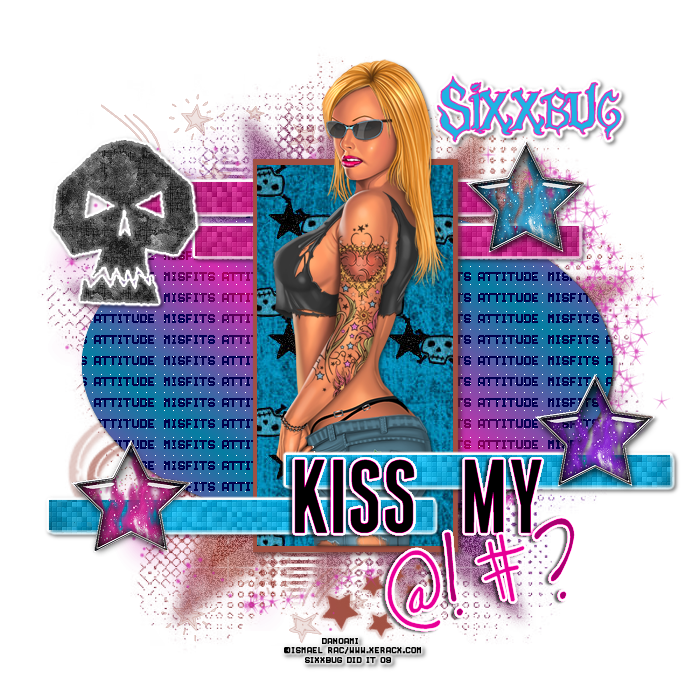
Supplies Needed:
My Template number 27 which you can download from my blog HERE
Scrap kit by Queen. It's a Misfits exclusive you can download from Creative Misfits Creations HERE
Mask 041 by Aqua and you can get it from her blog HERE
Word art by Vix and you can get it from her blog HERE
Tube of choice.
I'm using the work of Ismael Rac which You MUST have a license to use.
You can get one and purchase his work from AMI HERE
Filters Needed:
Eye candy 4000 (gradient glow)
Xero (fritillary)
MuRa's Meister (copies)
DSB flux (bright noise)
Penta.com (color dot)
Ok, Let's begin!
Open template and tube of choice.
Select Rectangle 2, the black one.
Selections, select all, float, defloat.
Open your tube, I used a half one, and copy and paste as new layer.
Layer, duplicate. On orriginal tube layer, go to Selections, invert and hit delete Select none.
Ok now select the top tube layer, the duplicate one, and carefully with eraser tool, erase any part of tube that overlaps the rectangle. Add drop shadow of choice.
Select Rectangle 2 layer again. Selections, select all, float, defloat.
Open paper 3 from kit and copy and paste as new layer. Selections, invert, delete.
Delete original Rectangle 2 layer.
Select Rectangle 1 layer, Selections, select all, float, defloat, Layers, new raster layer.
And flood fill with color #a15042
Select none, add drop shadow of choice. Delete original Rectangle 1 layer.
Open new canvas, 700x700. Flood fill it with the same color you used above.
Now select star brush layer, Selections, float, defloat. Copy and paste your flood fill canvas as new layer. Selections, invert, delete. Delete original star brush layer.
Select the oval layer. Selections, float, defloat, Layers, new raster layer.
Ok, now choose two colors to match your tag, any you want!
And make a gradient fill out of them, Settings~ Linear, Angle 36, Repeats 1
Flood fill the new layer Selections none. Delete original oval layer.
Select the new flood filled oval layer.
Effects, penta.com, color dot with the following settings~ 249,9,255,255,255 Ok.
Add drop shadow of choice.
Still on the same layer, I typed out the words "Misftis attitude" using pixel font, oh la la, color black.
You can use another small font and whatever text you would like.
Go to objects align, center in center, ok
Then convert layer to raster layer.
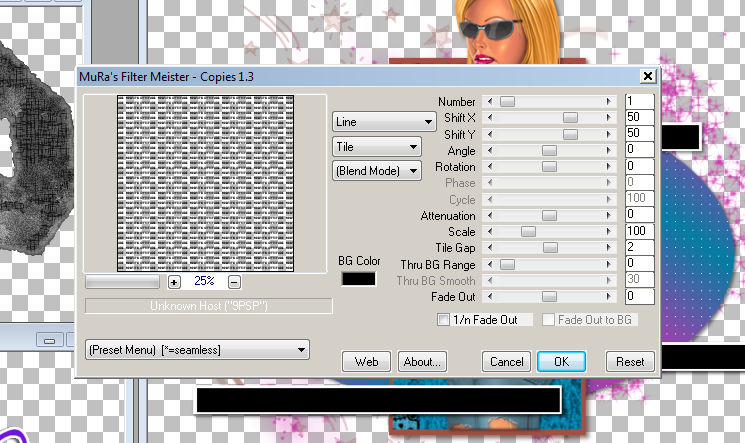
Go to effects, Mura's meister, copies, Use following settings:
Ok, now select your oval layer, Selections, select all, float.
While selected, go to your text layer, Selections, invert, hit delete.
Select none.
On text layer, change blend mode to overlay.
Select bottom bar layer. Selections, select all, float, defoat.
Open paper 11 from kit and copy and paste as new layer. Selections, invert, delete.
Delete original bottom bar layer.
Effects. Xero, fritillary, settings~ 5,30,10,21 ok.
Effects, Eye Candy 400, gradient glow, Settings~ Fat, 3,25,100.
Again add drop shadow of choice.
Now select top bar layer, repeat the exact same process, only use paper 10 from kit instead.
Open word art, go to adjust, hue and saturation, colorize, change settings to ~ 277,255.
Copy and past word art as new layer, see my tag.
Open skull 1 from kit, resize by 46%. Adjust, sharpen, hit once.
Copy and paste as new layer on tag, again see mine.
Add same gradient glow and drop shadow as before.
Open stars from kit, resize these by 46% also.
Copy and paste as new layer in random spots.
Ok, now go to layers, and merge visible.
Move your tag to the center of canvas.
Layers, new raster layer, move to bottom.
Make a gradient fill with 2 colors of choice, same settings as before.
Flood fill your new layer.
Open mask, Layers, new mask from image, and choose your mask from drop down menu, ok
Layers, merge group.
Still on that layer, Effects, DSB flux, bright noise, Intensity 50, Mix checked.
Now add your copyright info and your name.
I used Pasion Acusica font, and added gradient glow and drop shadow.
Save as a PNG image and your all done!
Thanks for trying out my tutorial.
Hope you found it easy to follow.
This tutorial was written by me on August 4 ,2009
And any similarity to any other tutorial is purely coincidental.