Supplies Needed:
Template 86 by Melissa of Melissaz Scrapz HERE
Vix mask 404 which you can get on her site HERE
Reyna's dress scrap kit by Leigh, it's a PTU kit and you can purchase it HERE
Tube of choice. I'm using the awesome work of Ismael Rac which you MUST have a license to use.
You can get one and his work from AMI HERE
Filters Needed:
Eye Candy 4000 (gradient glow)
MuRas meister (copies)
Ok, Let's get started!
Open template and go to Image, canvas size 700x700. You can resize later.
Select raster layer 4. Go to your text tool and type out the word Respect. Use a small font. I used Oh La La.
Objects, align, center to center.
Layers, convert to raster layer.
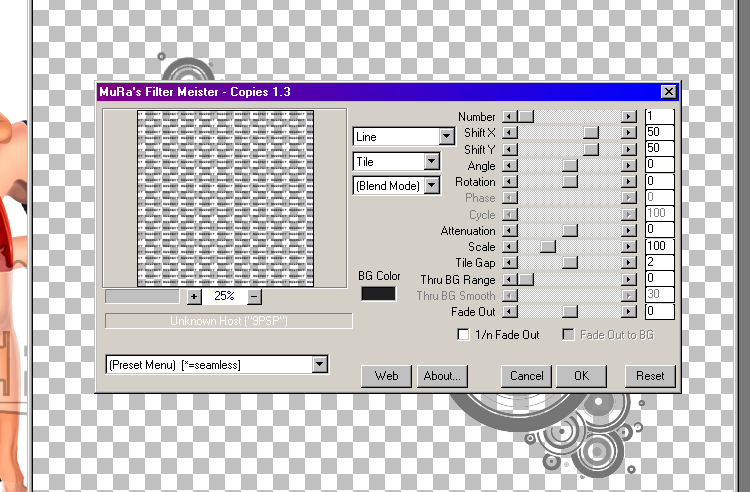
Effects, Mura meister, copies with the following settings:
Click back on raster layer 4, Selections, select all, float, defloat.
Ok, now click back on your text layer, Selections, invert, delete. Select none.
Select raster layer 4 again, Selections, select all, float, defloat, layers, new raster layer.
Make a gradient, I chose red to match the tube, and white, so the lettering would still show up good. Settings: Linear, Angle 64, Repeats 0. Ok.
Flood fill your new layer. Select none.
Delete original raster 4 layer.
Select raster layer 3, Selections, select all, float, defloat, layers, new raster layer, and flood fill white.
Select none. Add drop shadow of choice.
Delete original raster 3 layer.
Select raster 1, the larger circle. Selections, select all, float, defloat.
Open paper 1 from kit, resize it by 50%. copy and paste as new layer.
Selections, invert, delete.
Effects, Eye candy 4000, gradient glow, Settings: Fat, white, 3.00,25,100 Ok.
Add drop shadow.
Now delete original raster 1 layer.
Now select raster layer 2, the small circle. And repeat all the steps above.
Select the merged layer, the other circles. Selections, select all, float, defloat.
Open paper 43 from kit and copy and paste as new layer.
Selections, invert, delete.
Add drop shadow.
Delete original merged layer.
Now open your tube, copy and paste as new layer, bring this layer to the top and add drop shadow of choice.
Open element 26 from kit, the red butterfly. Resize by 50% and copy and paste as new layer.
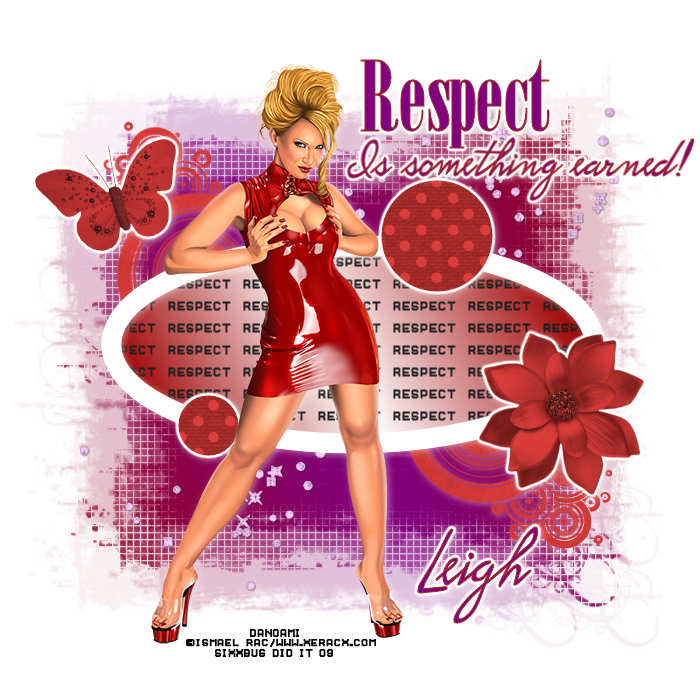
See my tag for reference.
Effects, gradient glow, same settings you used before.
Add drop shadow.
Open element 22 from kit, resize by 50% and copy and paste as new layer.
Again see my tag for reference.
And again add the same gradient glow and drop shadow.
Layers, new raster layer, and send it to the bottom.
Make another gradient fill, I used a dark red to match tag, and a purple. Same settings as before.
Flood fill your new layer.
Open up your mask.
Layers, new mask layer from image, and find the mask from the drop down menu,ok
Layers, merge group.
Ok, with mask layer still selected, Open element 73 from kit and paste as new layer.
Layers, merge visible
Now for the text
Make your foreground and background colors to match the rest of tag.
Type out the word respect. I used Onyx font for mine.
Place at the top of the tag.
And add the same gradient glow and drop shadow as before.
Now type out the words, Is something earned in a different font. I used P22 Hopper font.
And add same gradient glow and drop shadow.
Now add your copyrights and your name and your all done!
Hope you enjoyed this tutorial.
This tutorial was written by me on August 1,2009
And any similarity to any other tutorial is purely coincidental.