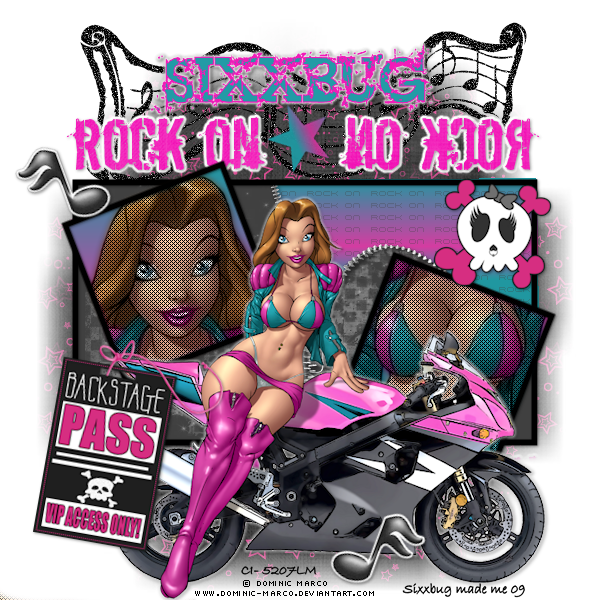
This tutorial was written using PSP X2, but any version should work
Supplies Needed
Template 26 by Melissaz Creationz which you can download from her blog HERE
Vix Mask 10 which you can download from her site HERE
Rock of love scrap kit by Kristens wicked scrapz which you can download from her blog HERE
Tube of choice, preferably one with a close up also.
I'm using the awesome work of Dominic Marco, which you MUST have a lisence to use.
You can get a lisence and purchase his tubes from CILM HERE
Filters Used
Cybia Screen works (light gauze)
Eye Candy 4000 (gradient glow)
Ok Let's get started!
Open your template and tube of choice.
On your template go to Image, canvase size 600x600
Close out copyright info, and delete small square layer, and small square frame layer.
Select the large square background layer
With your magic wand tool . tollerance and feather at 0 click inside both squares.
Open your tube of choice, and copy and past the larger one twice, so 2 different parts of the tube are showing in each square.
Selections, invert, delete on both tube layers.
Duplicate both tube layers, on the bottom layers, go to Adjust, blur, gaussian blur, settings 3.00.
On the top layers, change blend mode to luminance L.
Still on the top layers, go to Effects, Cybia, Screenworks, light gauze, default settings, ok.
Select your large square layer again. Selections, select all, float, defloat, Layers, new raster layer.
And make a gradient out of 2 colors from your tube, settings ~ Linear, angle 0 repeats 0 and flood fill your layer. Selections none. Delete you original large square layer.
Select rectangle background layer.
Take your magic wand tool, tollerance and feather at 0 click just the part with the text
Layers new raster layer, and flood fill with the same gradient you used above. Selections none
Select star layer, Selections, select all, float,delfoat, Layers, new raster layer.
And flood fill with gradient again, only this time change your angle to 68, repeats 2.
Selections none. Delete original star layer. Add drop shadow, 1, 1, 40,3.96, black.
Select rectangle frame layer, select all, float, defloat, Layers, new raster layer
And flood fill with black.
Selections none, Delete original rectangle frame layer. Add drop shadow .
Select large square frames, and repeat above steps.
Select rock on layer. Selections, select all, float, defloat, open paper 1 from kit, and paste as new layer
Selections, invert, delete. Delete original rock on layer. And add drop shadow
Go to Effects, Eye Candy 4000, gradient glow, Settings ~ Color fat, white, glow width 3.00, soft corners 25,
Overall opacity 100, Draw only outside of selection checked. Ok.
Copy and paste your main tube as new layer. Resize if you need to, I resized mine just a little bit.
Add gradient glow effect to tube, only change color setting to thin.
Add drop shadow.
Ok, now select your rock on layer again, and erase any parts of the lettering showing under the tube on the bottom.
Layers, new raster layer, and send to the bottom.
Open paper 12 from kit and flood fill your new layer
Open your mask, go to Layers, new mask from layer, and select your mask from the drop down menu ok.
Layers, merge group.
Layers, duplicate, Image, flip. And move this second layer down a bit so that some of the mask shows on the bottom of the tag.
Open skull 4 from kit and resize by 40%. Copy and paste as new layer, arrange to the right side of the tag. Add drop shadow
Open your backstage pass and resize by 50%. Copy and paste as new layer, Image free rotate by 10 to the right, and place on left hand lower part of tag.
Open music notes from kit, and copy and paste as new layer. Move down so that they are just above your mask layer, and place at the top of your tag.
Open sticker 2 (music note) Resize by 40%. Image, free rotate by 20 to the left, and place at the top left of the tag
On open sticker, go to image mirror, and free rotate by 20 to the right , and place at the bottom of the tag.
Add drop shadow to both.
Layers, merge visible
Add your copyrights and your name.
I used Heroin 07 font, and added gradient glow with color setting on medium white, and added drop shadow
And your all done! Save as a PNG file.
Hope you enjoyed this tutorial!
This tutorial was written by me on May 27,2009
And any similarity to any other tutorial is purely coincidental.