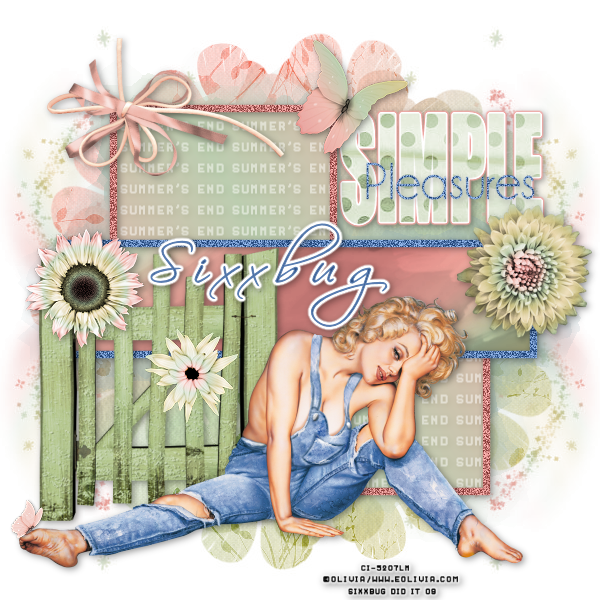
Supplies Needed:
Template and Mask, both by Vix The Mask is part of her goodie bag.
and you can get that from her blog HERE
Vix template 09 HERE
Scrap kit Breezy by Melissa, you can download from her blog HERE
Tube of choice.
I'm using the work of Olivia, which you MUST have a license to use.
You can get one and purchase her tubes at CILM HERE
Filters Needed:
Eye Candy 4000 (gradient glow)
MuRa's meister (copies)
Ok, let's get started!
Open template and X out copyright info.
Open element 19 from kit (green fence) and resize by 72%
Copy and paste as new layer to lower left of tag, see mine.
Add drop shadow 2,2,40,10.26
Open tube of choice (perferably one sitting or lying down)
Copy and paste as new layer, arrange to your liking and add same drop shadow.
Open element pages from kit, and using your lasso tool, select a few flowers, butterflys, or any other elements you want to use. Copy and paste them as new images in your psp.
Ok now to chose a few flowers and resized them by 45% and placed them in various places on my tag.
I also chose a butterlfy and resized that by 45% twice and placed by the tubes foot.
Add drop shadow to any elements you use. Again, see my tag for reference.
Ok, open butterly element form kit, resize by 45% and copy and paste at the top of the "Simple" word art and add drop shadow.
Open element 12, resize by 45% and copy and paste as new layer towards top left of tag, again see mine.
Ok, now select your Square fills layer.
Go to your text tool and select a small pixel font, I'm using oh la la
Set your foreground and background both to white.
Type out the words, Summer's End.
Objects, align, center in canvas
Convert to raster layer
Go to Effects, MuRa's meister, copies
Make sure it's set on ~ Line, Tile, Blend mode
Set number to 1 and tile gap to 2
Leave everything else as it is and hit ok.
Using your move tool, make sure your text is lined up so it looks right in the box.
Ok, now select your Square fills layer again, Selections, select all, float, defloat.
Select your text layer, Selections, invert, delete, select none.
Again select your Square fills layer, Selections, select all, float, defloat, Layers, new raster layer.
Make a gradient out of 2 colors to match your tube, and flood fill this layer.
Deletet original Square fills layer.
Now again select your summer's end text layer and change blend mode to soft light, and add some drop shadow.
Select copy of rectangle layer
Selections, select all, float, defloat.
Open paper 1 from kit, and copy and paste as new layer.
Layers, invert, delete, select none.
Delete original copy of rectangle layer.
Select squares frame layer
Selections, select all, float, defloat, Layers, new raster layer
Change foreground color to #c37774
and flood fill your layer.
Go to Adjust, Add/Remove noise, add noise, Settings: Uniform checked, Noise 55%, Monochrome checked. Ok
Add drop shadow and delete original square frames layer.
Select rectangle frame layer and repeat steps, only use a different color to flood fill.
I used #597db1
Select "pleasures" word art layer
Selections, select all, float, defloat
Open new canvas and flood fill with the #c37774 color
Copy and paste as new layer, Selections, invert, delete.
Delete original pleasures layer.
Again go to Adjust and add the same noise setting you used before, then add drop shadow.
Select "simple" word art layer/
Selections, select all, float, defloat
Open paper 3 from kit and copy and paste as new layer
Selections, invert, delete.
Go to Efffects, Eye Candy 4000, gradient glow
Settings: Fat, 3.00, 25, 100
On the sliding color bar, click on the second white box
Then where the large box is and it says color, click that and your pallet should pop up.
Change color to #1a5a2
Now back on the slider bar, move white box over to middle.
You should now see 2 white boxes and your new colored one.
Hit ok, I hope I made that easy enough to understand!
Now add drop shadow, and delete original simple word art layer.
Ok now select layer that says "optional tag.."
Selections, select all, float, defloat.
Make another gradient fill, same setting as before
Foreground set to #597db1 and Background set to #bdceb1
Open a new blank canvas and fill with this new gradient.
Copy and paste as new layer
Layers, invert, delete, select none.
Delete original optional tag layer.
Now select your white background layer.
Open paper 6 from kit and copy and paste as new layer.
Open your mask
Go to Layers, new mask layer from image, and find your mask in the drop down menu, ok.
Layers, merge group.
Open element 7 from kit
Copy and paste as new layer, arrange so it's just above the white background layer.
Layers, duplicate, Image, mirror
Layers, duplicate, Image, flip
Layers, duplicate, Image, mirror
Ok, now add your copyrights and your name
I used Scriptina font for my name and added gradient glow and drop shadow.
Delete white background layer and same as a PNG image!
All done!
This tutorial was written by ME on September 20,2009
And resemblence to any other tutorial is purely coincidental.