This tutorial was written using PSP X2 But any version should work
Supplies Needed
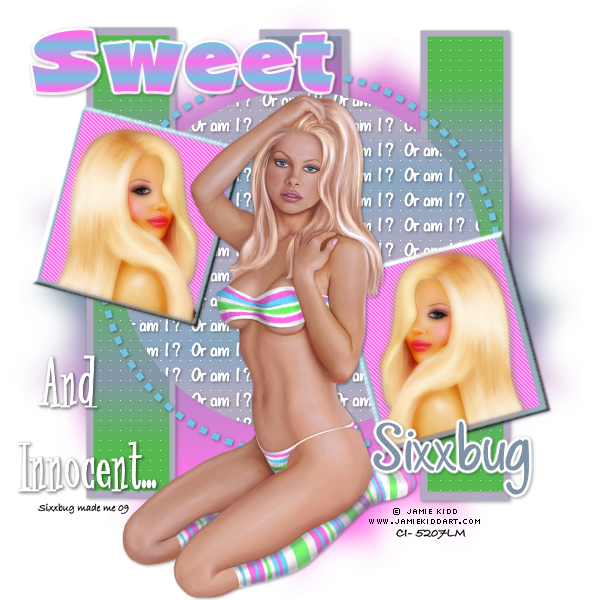
My Sweet and innocent template which you can get from my blog ~ HERE
WSL Mask 133 which you can download from Weescotslass Creations ~ HERE
2 Tubes of choice by the same artist.
I'm using the awesome work of Jamie Kidd
You MUST have a license to use his work
You can get one and purchase her work from CILM HERE
Filters Needed
MuRa Meisters (copies)
Penta.com (color dot, and jeans)
Eye Candy 4000 (gradient glow)
Ok Let's begin!
Open your template
Select the Circle layer.
Open your text tool and using a small font ( I used AL featherbrained size 8)
type out the words Or am I?. In the color of choice.
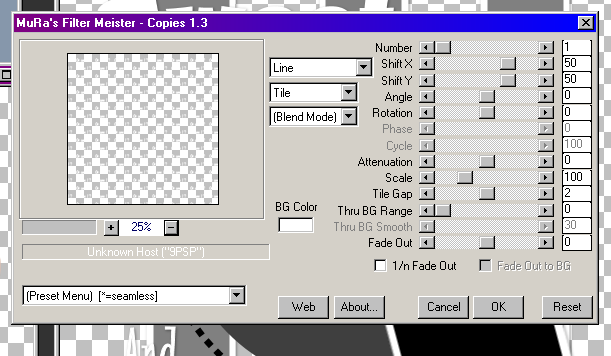
Layers, convert to raster layer. Go to Effects, MuRa Meisters, copies, with the following settings:
Back on your circle layer, Selections, Select all, float, delfoat, invert.
Then Select your text layer and hit delete. Selections none
Back on your circle layer, Selections, select all, float, defloat, Layers, new raster layer.
Now make a gradient using 2 colors that match your tag. Settings, Linear, Angle 0, Repeats 1. Flood fill your circle with this color. Select none.
Go to Effects, Penta.com, color dot, change distance to 10 ok.
Delete original circle layer
Back on your text layer, add drop shadow of choice and merge down
Ok, now select your small square1 layer
Using your magic wand tool select inside
Open your tube of choice, first click on the tube and mirror it.
Then copy and past as new layer , arange in square
Selections, invert, delete, select none.
On tube layer, Layers duplicate
On bottom tube layer, Adjust, Blur, gaussian blur, set on 3.00, ok.
On top layer, change blend mode to Soft light.
Merge down so that you have 1 tube layer. And add drop shadow of choice.
Ok now, click back on your open tube and undo the mirror so it's back to normal.
Select you small square 2 layer, and repeat the same steps as above.
Ok now once again select your small square layer 1.
Selections, select all, float, defloat, Layers, new raster layer, and flood fill with a different color of choice to match your tubes.
Selections, invert, delete, select none.
Go to effects, Penta.com, jeans, use default settings, ok
Delete original small square 1 layer.
Repeat same steps with Small square 2 layer.
Select bar 4 layer. Selections, select all, float, defloat, Layers, new raster layer
Make a new gradient fill with 2 different colors to match your tag, same settings you used before. Flood fill, selections none.
Effects, Penta.com, color dot, same settings you used earlier. Delete your original bar 4 layer.
Ok select bar 5 layer and repeat above steps using same gradient fill.
Now select bar 6 and again repeat steps, only this time use 2 different colors for your gradient fill, and change your repeats to 4. Don't use the color dot this time either.
Select your Large square 1 layer. Selections, select all, float, defloat, Layers, new raster layer. And flood fill with color of choice.
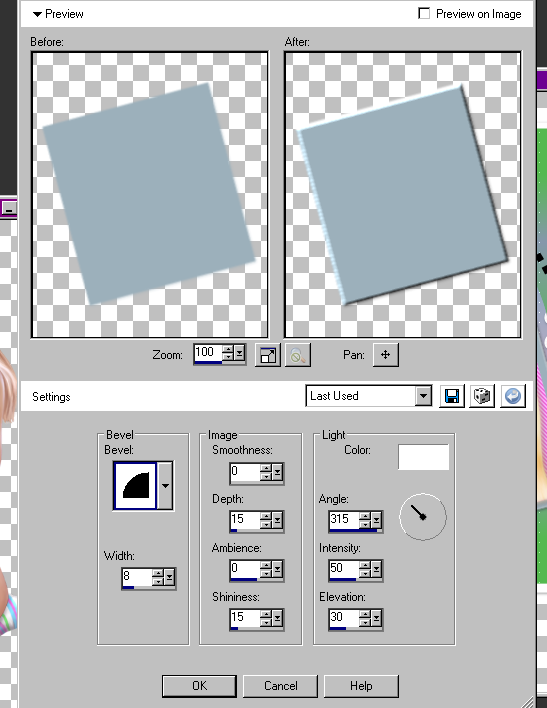
Go to effects, inner bevel and use the following settings
Delete original large square layer 1
Repeat steps with Large square layer 2
Ok select bar 3 and merge down twice so that all 3 bar layers are now one layer.
Selections, select all , float, defloat, Layers, new raster layer, flood fill with color of choice
Delete original bar layer. And add drop shadow of choice.
Select your circle dot layer. and again Selections, select all, float, defloat
Open new canvas and flood fill with the color you want our circle dot layer to be. copy and past as new layer, invert, delete.
Add drop shadow.
Select your sweet word art layer, and once again use the same steps to flood fill with color or gradient of choice. Eye candy gradient glow, color fat and add drop shadow.
Copy and paste your main tube and place where you are happy with it.
Go to bottom layer, Layers, new raster layer. Flood fill with color of choice
Open your mask
Layers, new mask layer from image, and choose your mask from drop down menu
Layers, merge group. Delete bottom layer. Layers merge visible
Add your copyrights. And your name.
I used AL featherbrained font, and added gradient glow and drop shadow.
Hope you enjoyed this tutorial and found it easy to follow!
This tutorial was written by me on May 19, 2009
and any resemblance to any other tutorial is purely coincidental.